How to Press Flowers: A Step-by-Step Guide for Gifts & Crafts
Why Pressed Flower Art is the Ultimate DIY Keepsake
Ever get a bouquet and wish you could keep it forever? Pressed flower art is your answer—part memory, part masterpiece. People have been squishing flowers between books for centuries (Victorian-era scrapbooks, anyone?), and today, this sweet tradition is trending hard with crafters, sentimental gifters, and Insta-aesthetic seekers alike.
What makes DIY flower art so magical? It’s real. It’s personal. And it lasts way longer than a vase full of blooms. Whether you're preserving a wedding flower or jazzing up your journaling game, pressed petals hit that nostalgic-meets-modern vibe just right.
And hey—don’t stress if your garden game is weak. Online flower delivery services make it super easy to get fresh, press-worthy blooms right to your door. Seasonal, rare, or just plain pretty? There’s a bouquet for that.
 What You’ll Need to Get Started
Good news: you don’t need a fancy setup to make something beautiful. Here's your starter pack for pressing flowers like a boss:
Must-Haves:
- Heavy books (think dictionaries or old textbooks) or a flower press
- Scissors (for snipping stems clean)
- Parchment paper (keeps moisture from wrecking your blooms)
- Tweezers (for gentle handling)
Optional (but awesome) extras:
- Mod Podge (seals flowers onto surfaces like a charm)
- Glass frames (hello, DIY wall art)
- Cardstock (for cards, tags, and journaling)
Quick Tip: No garden? No prob. Order a fresh bouquet from an online florist and look for sturdy flowers with thin petals—they press best.
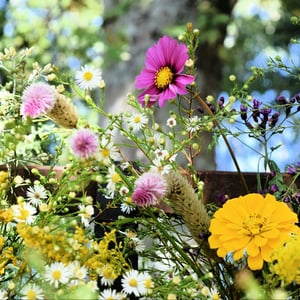
Best Flowers for Pressing: What Works and What to Avoid
Not all flowers are press-friendly—some just turn into a soggy mess. Here’s your cheat sheet for pressing success:
Top Picks:
- Pansies – Tiny, flat, and colorful. Basically made for pressing.
- Daisies – Classic look and great shape.
- Violets – Small and delicate, with deep color payoff.
- Lavender – Keeps its shape and scent? Yes, please.
- Ferns – Add a green, leafy balance to your designs.
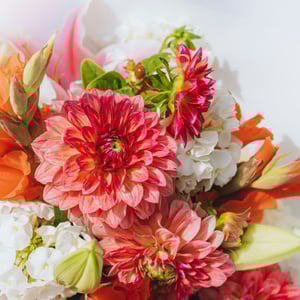
Avoid These:
- Succulents – Too juicy. Trust us, they’ll rot before they press.
- Thick Roses – Pretty in a vase, not in a book. They’re just too chunky.
- Orchids – Gorgeous but moisture-heavy and tricky to flatten.
Want the good stuff delivered before it blooms? Try flower delivery platforms that ship wildflowers or seasonal picks right when they’re perfect for pressing.
Step-by-Step Pressed Flower Tutorial
Step 1: Pick Your Blooms
This is where the magic starts. Head out in the morning when flowers are fresh and dewy—but not soaked. Why early? Because flowers tend to have lower moisture content at this time, which helps avoid mold during pressing.
Snip the blooms gently using clean scissors or garden snips. Go for flowers that aren't bruised, torn, or wilting—basically, the best of the bunch. Cut the stems short if you're just pressing the heads, or leave a bit more if you're planning to press the whole stem and leaves.
Step 2: Sandwich ‘Em
Now it’s time to prep your blooms for flattening. Take a piece of parchment paper (or blotting paper if you’ve got it) and lay your flowers face-down. This helps preserve the detail of the bloom’s front side and gives you a more vibrant result.
Space them out — don’t overcrowd or they might stick together or get smooshed in weird ways. Once arranged, place another sheet of paper on top. This whole “paper flower sandwich” keeps moisture from getting into your books or press, and protects the petals from direct contact with rough surfaces.
Step 3: Press ‘Em Flat
Gently place your flower-paper sandwich inside a big ol’ heavy book (like an old encyclopedia, cookbook, or textbook). If you’re feeling extra, stack more books or weights on top—seriously, the heavier, the better.
If you have a flower press (those wooden ones with bolts), even better! Just screw it tight and let time do the rest. The goal here is steady, even pressure.
Step 4: Wait It Out
Here’s the part that’s hard for impatient folks—leave your flowers alone. Like, totally undisturbed. Don’t peek or shuffle the stack. Every time you move things, you risk wrinkling or breaking the petals.
Depending on the flower type and thickness, it usually takes 7 to 14 days to dry fully. You’ll know they’re done when they feel papery and stiff, with no coolness or flex left in the petals.
Step 5: Reveal & Use
Moment of truth! Open up your press or book carefully and use tweezers to lift the flowers—no grabbing with your fingers unless you’re super gentle. They’ll be delicate like tissue paper, so handle with care.
From here, the possibilities are endless. Make a card, decorate your wall, DIY a candle, or just stash them away for future projects.
Craft Ideas with Pressed Flowers
Pressed flowers aren’t just for bookmarks, okay? There’s a whole world of artsy goodness waiting for your petals.
Ideas to Try:
- Framed Wall Art – Arrange petals by color or go full collage mode. Add a quote if you’re feelin’ extra.
- Handmade Greeting Cards – Stick them on cardstock, seal with Mod Podge. Boom—one-of-a-kind.
- Candle Decor – Wrap around candles in wax paper or embed in clear wax.
- Phone Case Inserts – Pop pressed blooms into a transparent case and seal with UV resin.
- Gift Tags & Wrapping – Tiny flowers = big charm on your next present.
Got a favorite bloom? Make it the star of your next project and let the compliments roll in.
Craft It, Keep It, Love It
Pressed flower art is way more than just a craft—it’s a little love letter to nature, beauty, and the moments we want to hold onto. So grab your petals, fire up that glue gun, and make something gorgeous. And hey, don’t forget—the right blooms are just a click away.
FAQ: Pressing Flowers for Crafts, Décor & Gifts
1. What’s the best method for pressing flowers at home?
The most common and beginner-friendly method is pressing flowers between heavy books. Place the flowers between parchment or blotting paper, then sandwich them inside a book with additional weight on top. Wait 1–2 weeks for them to fully dry and flatten. For faster results, you can also use an iron or microwave (with proper precautions).
2. Which flowers press best and retain their color?
Flowers with naturally flat faces and low moisture content press best. Good examples include pansies, daisies, violets, ferns, and lavender. Avoid thick, fleshy flowers like tulips or lilies unless you separate their petals first. White and yellow flowers tend to keep their color better than reds and purples, which may darken over time.
3. How do I keep the colors vibrant when pressing flowers?
To preserve color, press flowers as soon as possible after picking. Make sure they’re dry and clean before pressing. Use acid-free paper and avoid direct sunlight or humidity while drying. You can also use silica gel for vibrant preservation, though that’s more common for 3D drying than flat pressing.
4. What can I do with pressed flowers once they’re ready?
Pressed flowers are perfect for handmade cards, bookmarks, framed art, candles, scrapbooking, resin crafts, or decorating journals and phone cases. They also make meaningful gifts when arranged creatively, especially for weddings, birthdays, or memorial keepsakes.
5. How long do pressed flowers last, and how should I store them?
When stored properly (away from sunlight, heat, and moisture), pressed flowers can last for years. Keep them in a sealed album or between sheets of acid-free paper inside an envelope or box. For displayed pieces, use UV-protective glass and low-humidity environments.